Inserting & Changing Infusion Sets
Tips on Inserting & Changing insulin pump infusion sets
Owner's manuals can tell you how-to, but practical tips from other pumpers are indispensable! What's the best tubing angle? How do we avoid accidental pull-outs? When, where and how often should a set be inserted? How do we remember to do so on time, in the craziness that is our family's life? How can we remove the set without crying and tears? What are the signs of skin irritation or a reaction? We'll explore these and other life hacks in this guide to inserting and changing insulin pump infusion sets.
So you’ve got a cartridge filled with insulin and you’re ready to insert the infusion set (according to the instructions in the pump user manual). But what factors should you consider?
Tubing Angle:
Different insulin pump users have different preferences for the angle from the infusion set at which the tubing sits. We encourage you to experiment with different tubing placement angles to see which works best for your child, keeping the following considerations in mind:
For a site around the waistline (belly, bottom or thigh), if the infusion set is inserted with the tubing coming straight up or straight down, some insulin pump users find that the tubing is more likely to get snagged on a hand or pant material when pants are being pulled up or down. Further, if the tubing comes straight out to the left or right (horizontally), it tends to be a bit more difficult for the individual wearing the pump to access the connector on her own (to connect or disconnect the pump tubing).
For arm or thigh sites, running the tubing vertically along the arm or leg may work best.
Some infusion set models (that is, Orbit infusion sets) rotate 360 degrees while they are connected. In this case, you don’t have to think twice about the tubing angle at insertion time – you can easily rotate the tubing to a convenient position after insertion... handy!
Tip from the Trenches
We have found that, for infusion sites on buttock area, about 10 degrees up from the horizontal position works best for my teen son: at that angle, he’s able to easily access the connection clip to connect or disconnect the pump, and clothing is less likely to get in the way.
-Danielle
Avoid the Oops!
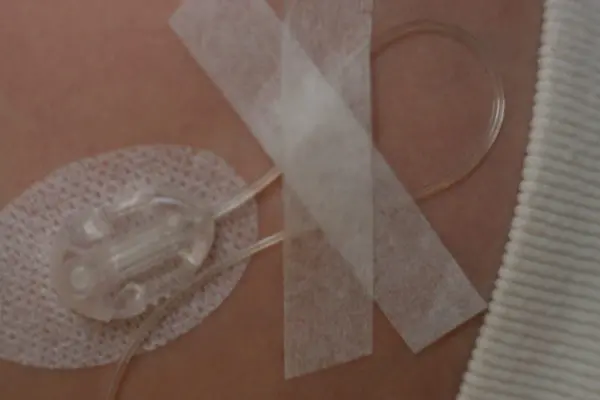
After the infusion set has been inserted, it will be much less likely to be accidentally pulled out if you secure the tubing to the skin using a piece of medical tape. (We like paper first aid tape, as it’s softer – but there are many types out there to try.) Simply arrange the tubing in a “safety loop” and then tape the tubing down in that configuration. Then if the tubing gets snagged on clothing, a knob, or a finger... the tape will fight back, or the safety loop will come undone, absorbing the force and leaving the infusion set in place.

Where to Insert?
It’s important to choose an effective place on the body to insert the infusion set, as this impacts how well insulin is absorbed (which, in turn, affects how well blood glucose is managed). You reduce the risk of many pump-related problems by choosing a good place to insert the set.
Best Practice for Choosing an Insertion Site:
Rotation, Rotation, Rotation...
If an infusion set is left in too long, or a particular site is overused, then poor absorption, infection, tissue damage/scarring, and lipohypertrophy could develop.
Infections are more likely to occur at infusion sites than with injections, as the infusion set is left in place for 2-3 days. It’s wise to check the infusion site often (not just when you change the set) for signs of redness, swelling or bleeding. Let your child know that if the area feels itchy, painful, or hot, they should tell you. If any of these traits appear, contact your child’s health care team for assessment.
Scar tissue from a previous wound or surgery can interfere with insulin absorption, leading to lack of absorption or unpredictable absorption. Therefore, it is best to avoid areas with scar tissue.
Lipohypertrophy, or the formation of fatty lumps under the skin, are a result of overuse of a particular area, which may happen because of inadequate rotation of sites or too many days between set changes. Kids often have a “favourite spot” for infusion set insertions, which they may be able to reach easily, or which may hurt less. But if they stick too much to that spot, fatty lumps will develop. If this area is used subsequently, insulin absorption will likely be ineffective or unpredictable, making it even more difficult to manage blood glucose. If you notice, when using a certain area for infusion sites, your child experiences unexplained high blood glucose, or greater-than-usual blood glucose swings, then it may be wise to feel the area with your fingertips, looking for lumps under the skin. If you have any question that lipohypertrophy has developed, please consult your child’s diabetes health care team. And avoid using that area for infusion sites in the meantime.
In short, the risks of poor absorption, infection, tissue damage/scarring, and lipohypertrophy can be reduced by systematic rotation of infusion sites. Any changes in the appearance of the skin in areas used for infusion sites, including dimpling, irritation or lumps, are best checked out by your child’s diabetes health care team.
When to Insert?
Many diabetes health care professionals recommend against changing an infusion set before bedtime. If the site does not absorb well, or the cannula gets kinked on insertion, there are many unmonitored hours overnight during which things can go from bad to worse. Ketones could develop and progress to dangerous levels during a typical night’s sleep.
Or the opposite effect may prove problematic overnight... Many insulin pump users report that their infusion sets work particularly effectively during the first several hours of a new site. This increases the risk of night-time lows, at a time when your child is unattended and unaware as he is sleeping.
For this reason, here are a few good rules of thumb:
-
Change the set at least 4 hours before bedtime
-
check blood glucose 2 and 4 hours after a new set is inserted, to make sure everything is going as expected.
Tips from the Trenches
For better or for worse, we often change our son’s infusion set after he has gone to sleep, and sometimes as we are about to go to sleep ourselves. Even though our habit is directly opposite to the recommendations of many diabetes health care professionals, we started doing things this way because our son got very anxious about set changes. To avoid this upset, and because the end of the day is when things slow down enough to have time to do a set change, we typically change his sets in the late evening hours. When we have changed a set before we go to sleep, however, we always get up a few hours later to check his blood glucose and make sure the new set is functioning well.
-Michelle
SHARE THIS ARTICLE
How Often Should We Change the Set?
Common advice is to change the infusion set every 2-3* days if you are using a set with a flexible (vs. metal) cannula, and to change it at least 24 hours before your child's blood glucose typically tends to rise; if BG tends to rise 72 hours after you insert a set, then it's wise to change it at 48 hours.
However, there is growing evidence that consistent insulin absorption gets sketchy after 2 days, and so stretching the period between set changes even to 3 days may lead to unpredictability in glucose readings. Also, the longer a given set is left in one place, the greater the chance of skin problems. See how your child's body responds.
Infusion sets with a metal (fixed) cannula should be changed more often than those with a flexible cannula. Common advice is to leave them in place for a maximum of 48 hours; less if you notice problems with blood glucose swings or discomfort.
Of course, there is always the matter of economics. With the high price of insulin pump supplies, many users (especially those who do not have coverage under a provincial government plan or a private extended health care plan) may feel the pressure to stretch their dollars by stretching the time between infusion set changes. We cannot make this decision for your family, however, we encourage you to monitor blood glucose closely after the second day of a given set, looking for trends of rising blood glucose or increased swings. We also encourage you to consider in your decision the “cost” of high blood glucose, the stress of unpredictability, and the hassle of putting out diabetes-related fires. In the end, changing a set every two days may be of more benefit than cost.
Remember When?

If you’re like me, it can be a challenge to remember to complete a regular task such as infusion set changes. But changing the set on time every time is a critical part of being a safe and effective insulin pump user.
Some families find that putting a note or star on a wall calendar to highlight set change day helps them remember when it’s time to change their child’s infusion set. Others use an electronic calendar tied to their email, or in their smart phone or tablet. Or, there’s an app called Set Change that gives you gentle reminders when your infusion set is due for a change, and then increases its nag-factor if you miss it.
Also, many pumps include a Reminder function in which your child’s insulin pump beeps or sings at a set time. At each set change (if it allows you to set it at least 2 days later), you could set it for when the next set change is due.
Or you could develop a system for set changes that links set changes with another regular activity, such as bath night, soccer practice, Cub Scouts/Brownies, or gymnastics. Whatever rotates on a 2-3 day schedule.
Tips from the Trenches
Our family is in the habit of tying set changes to a particular day of the week. Having set days for set changes (Monday evening, Wednesday evening, and Saturday morning) helps us remember when they need to be done. Before using this approach, we found it easier to remember to do a set change every second day (vs. every third day)... each evening we would ask ourselves: did we do a new button last night? If not, then we knew it was button night. Conversely, when we tried a schedule of every 3 days, it seemed like we lost track of days, and the time period too often slipped to 4 days.
-Michelle
A Fresh Start for Insulin
It makes sense in most cases to change the insulin in the pump reservoir/cartridge at the same time as you change the infusion set: every 2 (maximum 3) days. And there is more than just convenience at stake here. Insulin, when held in a plastic container, is not stable beyond a few days; it begins to lose its effectiveness. If you are in the habit of changing the infusion set every 2 days, but want to conserve insulin, you can still *opt to change the insulin in the pump reservoir/cartridge every 3 days; it will simply be out-of-sync with every second set change (and in sync with alternate set changes, every 6 days).
*Note: This is true only for infusion sets in which the tubing and/or cartridge can be disconnected from the cannula housing, which is not true for patch pumps (such as Omnipod/Omnipod DASH), as the insulin reservoir is contained within the infusion set. In this case, the insulin is changed every time the set is changed.
Reducing Insulin Waste
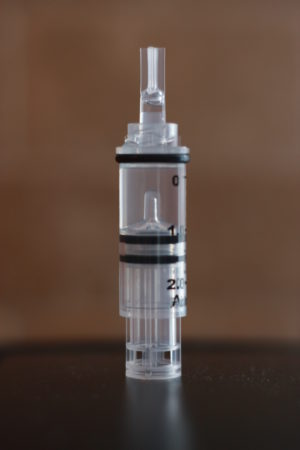
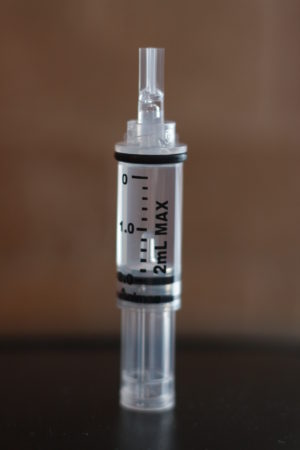
You may also consider the amount of insulin you load into a pump reservoir/cartridge. Some users prefer to do a full fill every time (fill the pump reservoir/cartridge to the maximum amount), as it reduces the chance that you will run out of insulin between set changes, and may also reduce the chance of air bubble trouble. Other users opt for a partial fill, loading into the pump reservoir/cartridge only the amount of insulin that they anticipate using before the next set change. This latter strategy reduces insulin wastage and, depending on your Total Daily Dose (and therefore the amount of insulin you are likely to use over 3 days), may not detract from convenience at all.

-
Partial fill of an insulin pump cartridge

-
Full fill of an insulin pump cartridge
Tips from the Trenches
Our pre-school-age son’s Total Daily Dose of insulin is around 10U. Over 3 days, he is likely to use less than 40U of insulin. Even if we add 20U for priming, we still only need to fill his pump cartridge to around 60U. To build in a cushion, we usually fill to around 100U, about half of the pump cartridge capacity of 200U. A partial fill allows us to avoid wasting 100U of insulin on every cartridge change.
-Michelle
Removing the Infusion Set
On the Outs
Taking off an infusion set is much like removing a band-aid: most people are fine with it, some dread the process. If your child complains of pain or discomfort when you are removing an infusion set, consider the use of Remove™ wipes. They come in single-use packets (like alcohol swabs) and are soaked with a chemical that breaks down the sticky adhesive, so that the tape can be pulled off without pulling on the skin. You could also try applying olive oil to the tape to loosen the adhesive; another possibility is to remove infusion sets after a bath or shower, when the adhesive may be weaker.
More on removing infusion sets and sensors easily and painlessly
Skin Irritation or Allergy/Reaction?
Once the infusion set is off, take a look at the skin underneath to see how it’s faring. A healthy former site should not be red, irritated or itchy, and the spot where the cannula entered the skin should not be enlarged, oozing, overly red or itchy. If you see any of these signs, it may be wise to have your child’s diabetes health care team assess.
More on reducing skin reactions and irritation:
The above information was significantly modified, with permission, from The Alberta Children’s Hospital Diabetes Clinic information handouts.
The above information was reviewed for content accuracy by clinical staff of the Alberta Children’s Hospital Diabetes Clinic.
SHARE THIS ARTICLE