Injecting Insulin with a syringe or insulin pen
Here we will detail best practice in terms of general injection technique (with an insulin pen or syringe), the best timing for injections, when we can expect kids to self-inject, and how to choose an injection site.
Background Reading for this Article:
If you have not already done so, we recommend you read Preparing a Dose of Insulin (Syringe) for the steps that come before injecting.
Timing of Injections
Blood glucose management is enhanced by:
-
Injecting long- and intermediate-acting insulin (Lantus®, N/NPH, for example) at about the same time each day. If necessary, you may give the injection one hour earlier or later than the usual time.
-
Giving rapid-acting insulin (Humalog®, NovoRapid®, Apidra®) when the meal is ready, before your child eats. Some families choose to administer insulin 15 or more minutes before eating, depending on the glycemic index of the snack/meal (if you can ensure that all the planned carbs will be consumed).
More on timing of insulin for different foods:
Who and When?
The age at which children may be able to self-inject is around 10 (based on developmental maturity), however, the need for supervision by a parent may continue for several years (to prevent insulin errors or omissions, and to ensure adequate site rotation).
For young children who are self-injecting, it’s wise to consider this task a shared responsibility with their parent.
Plan ahead: As with all diabetes care tasks, your child will benefit from you gradually handing over injection responsibilities. You could get your child started by having her mix the cloudy insulin, for example, or do the air shot with the insulin pen. You could temporarily re-adopt this task if your child needs help, or is experiencing burn-out.
General Injection Technique
The depth of injection impacts absorption, which therefore impacts the action of the insulin. Using effective injection technique can make the results more predictable, and can also decrease the risk of severe hypoglycemia (low blood sugar). According to FIT Canada guidelines:
-
The thickness of skin (epidermis and dermis) is about 1.6 – 2.3 mm for many children and adolescents; skin thickness increases progressively with age; skin thickness also increases from arms (thinnest skin), to thighs, to abdomen, to buttocks (thickest skin).
-
The ideal place to inject insulin is into the subcutaneous tissue (layer of fat below the skin), without going as deep as the muscle below. The distance between the surface of the skin and the muscle (at a 90 degree angle to the skin surface) may be less than 4mm in some children, particularly those 2-6 years old. In this case, injection technique becomes particularly relevant in order to have the insulin injected at the ideal depth.
-
Intramuscular injection (into the muscle, below the skin and below the fat layer) is not generally recommended, as this may lead to unpredictable results, as well as an increased risk of severe hypoglycemia.
-
Massaging the injection site is not recommended as it increases the absorption rate, which may lead to unpredictable results.
-
Alcohol wipes are not necessary for cleansing the injection site, unless the area is particularly dirty, or unless you have been advised to do so by your child’s health care team.
-
Avoid injecting through clothing, as the needle may not go deep enough, and the site cannot be inspected before injection.
-
You can use ice or analgesic cream on the site before injection, to reduce your child’s discomfort.
-
Cold insulin may sting when injected; insulin injected at room temperature may reduce this burning and irritation.
-
If skin is warm (from a hot bath or sauna, for example), the insulin may be absorbed more quickly.
Using a Pen
-
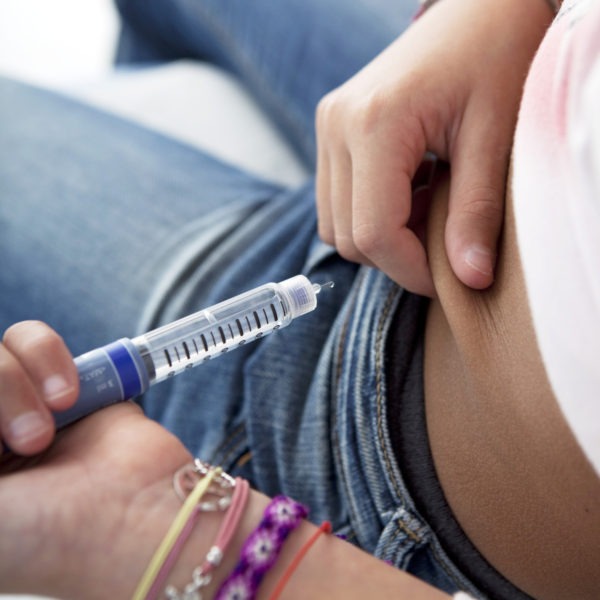
Insulin pens are the recommended injection device for children, as the needles are available in shorter lengths than syringe needles. To use a pen, your child must be able to hold still for 10 seconds; if that isn’t possible, you may want to use syringes for injecting insulin. For individual assessment and recommendations, consult your child’s diabetes health care team.
-
Use the shortest pen needle length available. According to FIT Canada, a 4mm needle can be inserted at a 90 degree angle without a skin lift in most older children and adolescents; consider a skin lift with a 4mm needle in children aged 2-6 years. For a lean older child or adolescent, 5 and 6 mm needles require a 45-degree angled injection with a skin lift.
- To perform a skin lift: using the thumb, index and middle fingers, gently pull up the skin and fatty tissue, without pinching up the underlying muscle.
- For individual assessment and recommendations, consult your child’s diabetes health care team.
-
Needle gauge: The higher the number, the smaller the needle diameter. The thinnest pen needles are available in 30, 31, or 32 gauge.
-
Steps for injecting insulin with a pen:
- Before every injection prime the pen: Dial up 2 units and with the needle tip pointing up, squirt off those two units, to ensure the pen is working.
- Dial the desired dose.
- In a quick motion insert the needle.
- Push the plunger bottom in completely and hold the pen in place for 10 seconds.
- Withdraw the needle – don’t forget to check the pen window to ensure that it reads “0”.
-
Pen needles should be used only once. Needles should be disposed of right after use (not left on the pen).


Using a Syringe
-
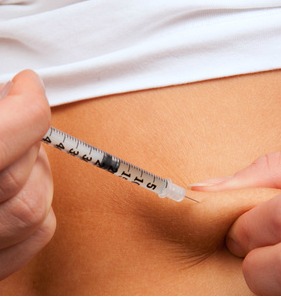
Use the shortest needle length available. The recommended length for syringe needles is 6mm according to FIT Canada, as it is the shortest currently available.
-
Injections should be given into a skin lift (pinch up the skin and fatty tissue without pinching up the underlying muscle) and insert the needle at a 45 degree angle..
-
The process (according to FIT Canada):
- Insert the needle completely into the skin lift,
- Depress the plunger and hold in place for 5-count (to prevent insulin leakage),
- Pull the syringe out and then release the skin lift.
-
Needles should be used only once. There is a risk of infection, as well as a dulling of the needle tip which increases the risk of developing fatty lumps. If you haven’t seen photos of a microscopic view of a syringe after a few uses, we recommend a quick net search for them – they’re convincing!
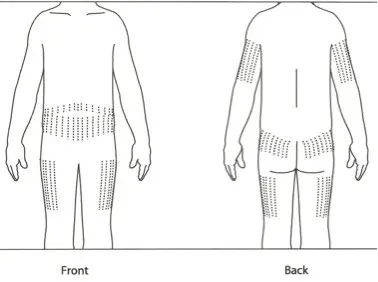
Choosing an Injection Site
-
Choose a different body area each injection time (for example, use buttocks for morning, arms for supper and legs for bedtime). This will encourage your child to use more injection sites, supports greater rotation of sites.

-
Avoid areas with scar tissue from a previous wound or surgery, which can interfere with insulin absorption, leading to lack of absorption or unpredictable absorption.
-
Rotate injection sites using a structured rotation schedule. Avoid over-use in one area (which is common with children and adolescents who have their favourite injection spots). Using the same small area all the time can cause a fatty lump to form (lipohypertrophy). If insulin is injected into these areas subsequently, it will not be absorbed as efficiently, resulting in high blood sugars and an apparent gradual increase in insulin needs. After this gradual increase in dose (to accommodate the inefficient absorption), if your child injects insulin in a spot that has not formed fatty lumps, that insulin will be absorbed more efficiently, which could lead to a low. For more information on site rotation and lipohypertrophy, see the link to the FIT guidelines (at the bottom of this webpage).
Tips from the Trenches
When my son was a toddler we injected into his bottom almost exclusively (because of the absence of fatty tissue in other areas); to prevent lumps we used the left side of his bottom on odd-numbered days, and the right side on even-numbered days, moving in horizontal rows, top left to bottom right, from morning to evening. ~Michelle
Fear of Injections
If your child has significant difficulty with injections (fear, crying, physically struggling), see the “Growing Up with Diabetes” pages in our Coping and Family Life section for strategies and suggestions. We have an article, written in response to our own son’s resistance to injections, which specifically provides tips for coping with the fear and pain of diabetes-related tasks, like injections.
Also, the psychologist and/or medical social worker on your child’s diabetes health care team is a valuable resource to consult for guidance in overcoming this issue.
Tips from the Trenches
When my son was a toddler, he had a very difficult time with injections. We overcame this by using an Insuflon/iPort which is a cannula inserted under the skin that insulin can be given directly into. This meant no more needle pokes except for the insertion of the Insuflon every 3 days, and for that we used a numbing cream.
~Danielle
Resource:
For more information on Injection Technique, see:
References:
The above information was significantly modified with permission from The Alberta Children’s Hospital Diabetes Clinic information handouts.
FIT injection guidelines, the most recent recommendations regarding injection technique. To access the full document, see FIT Forum for Injection Technique Canada: Recommendations for Best Practice in Injection Technique.
The above information was reviewed for content accuracy by clinical staff of the Alberta Children’s Hospital Diabetes Clinic.
SHARE THIS ARTICLE