The Low Down on the FreeStyle Libre/Libre 2 a.k.a. Flash Glucose Monitoring
You may have heard that Libre/Libre 2 is a quick and easy, no-lancet way to check your blood glucose... but what exactly is it and how does it work? Why is it called "Flash" and how is it different from CGM? We'll explain who can use it (it's not just for adults anymore!), what parts make up the Libre system, and what glucose information Libre gives you. Plus we'll tell you all about the new alarms that are available and how they can help you stay on top of managing your child's blood glucose.
What is Flash Glucose Monitoring?
Flash Glucose Monitoring measures glucose levels in the interstitial fluid, just underneath the skin, and is used by individuals who have diabetes (Type 1, Type 2 Diabetes… anyone who checks their blood glucose regularly). Designed as an alternative to fingerstick monitoring, it gives you the same general information as a blood glucose meter (that is, it gives you information about your glucose level) however, it does so by “scanning” a glucose sensor, without have to poke through the skin with a lancet each time you check¹. Abbott Diabetes Care, Canada, offers two Freestyle flash systems: the original Libre, and Libre 2.
Who can use Libre and Libre 2?
Libre 2 was approved in Canada in December, 2020 for individuals with Diabetes age 4 and up, so flash technology is now easily accessible for kids, too.
On the other hand, the original Libre "is indicated for measuring interstitial fluid glucose levels in adults aged 18 years and older who have at least 2 years of experience in self-managing their diabetes.”³ Although it is not approved by Health Canada for use by the pediatric population, your child’s doctor can write an off-label prescription for the system if she believes that it will benefit your child, which may allow you to claim the expense through an extended health insurance plan. If you are not concerned whether the expense qualifies under your private health plan, then any adult can order the system without a prescription. With Libre 2 coming to Canada soon, there is now little need to pursue an off-label prescription if your child is 4 years or older (unless individual insurance coverage is an issue).
SHARE THIS ARTICLE
How Does the System Work?
The flash glucose monitoring system consists of:
1. Sensor
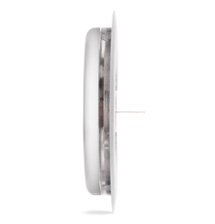
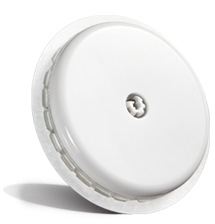
A sensor is a thin (less than 0.4 mm wide), flexible wire that sits just under the skin (5mm below the surface) and is inserted using an automatic applicator; the sensor is then held in place by an adhesive patch, similar to an insulin pump infusion set or CGM sensor. The sensor is the part of the system that actually measures (“senses”) glucose levels, using a proprietary "wired-enzyme technology"; it takes a glucose reading every minute, then stores those readings every 15 minutes. Sensors come factory-calibrated; you can't - and don't need to! - calibrate the sensors after insertion. Sensors are disposable: you wear one for 14 days (at which point it automatically stops working) and then you throw it out; a new sensor is inserted to begin the next flash glucose monitoring session.
2. Transmitter
The transmitter measures 35mm in diameter by 5mm thick², and is integrated into the sensor pod (unlike a CGM transmitter, which is a separate component you need to snap in) and as such, it is replaced when the sensor is replaced. The transmitter takes the glucose reading obtained by the sensor and sends it out (via wireless signal) to a separate receiver, called the “reader”.
3. Reader
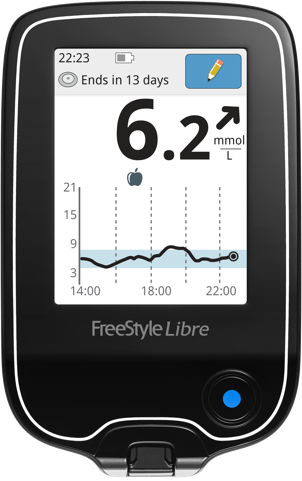
The reader “reads” the data from the transmitter, and displays the data on-screen. To access the glucose information, you simply “scan” the sensor by placing the reader within 1 cm to 4 cm of the sensor. You don’t even have to pull up your sleeve… the reader can access data readings though clothing (up to 4mm thick). Each time the sensor is scanned it automatically transmits data from the last minute, even if that data has not yet been stored.
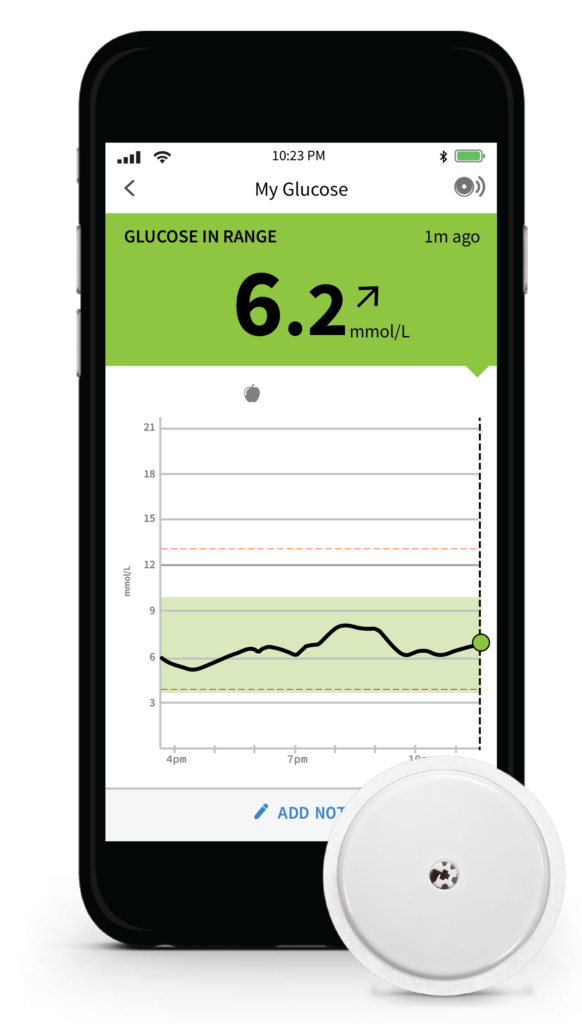
For the newer Libre 2 system, you can use either a dedicated reader (like the one used by Libre) OR you can use a smartphone with the Freestyle Libre 2 app mobile app; the sensor will communicate with whichever device was used to start the sensor session.
Both readers are powered by an internal, rechargeable battery that lasts about 7 days between charges.
Tips from the Trenches
You fellow Canadians will be happy to hear that my son can check his glucose using the Libre even while he’s outside building a snowman… the reader worked even through his thick winter coat!
-Michelle
How do the Transmitter & Reader Communicate?
In order to talk to each other, the original Libre reader and transmitter need to be quite close. This system uses Near Field Communication (NFC), a secure and highly robust method of transmitting data between two devices, the same technology used by debit or credit card “tap” machines. Unlike Bluetooth (which in its unsecured format is commonly used to transmit from your smartphone to an external speaker, or to the hands-free feature in your car, for example), NFC isn’t subject to “dropped” connections.
Libre 2, on the other hand, uses a combination of NFC, as well as Bluetooth Low Energy to enable the alerts and alarms that are features of Libre 2 (read on for more on these alarms). This means that the transmitter and reader can be much farther apart (up to 6 metres, or 20 feet), but as with all Bluetooth devices, there is a chance of signal loss between the two.
To summarize: The sensor measures glucose every minute, automatically storing those readings every 15 minutes. Each time the sensor is scanned it automatically transmits data from the last minute, even if that data has not yet been stored. In addition, scanning prompts the transmitter to send information to the reader about the current glucose reading, as well as those over the past 8 hours (even if you didn’t scan the sensor previously during that time).
What Information is Displayed?
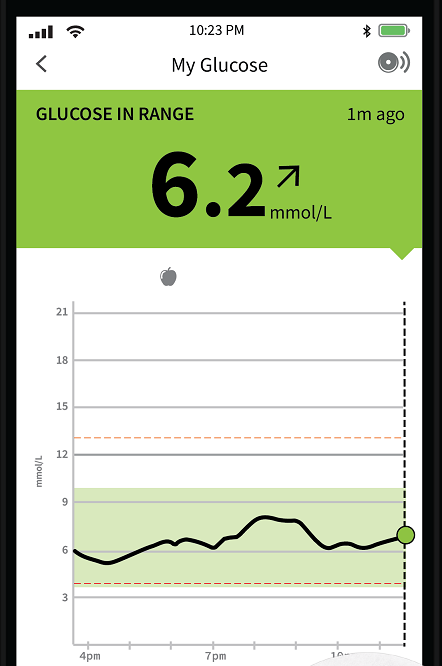
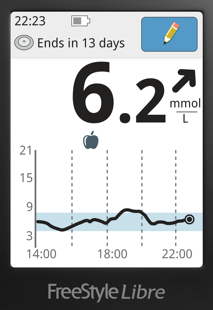
When you scan the sensor/transmitter, the following information is displayed on the reader screen:
Current Glucose Reading
This is the amount of glucose in the fluid around the sensor at the current moment (from 2.2 to 27.8 mmol/L). If the sensor reading is less than 2.2, it will display “LO”; if greater than 27.8, it will display “HI”.) The current sensor glucose reading will be displayed for both Libre and Libre 2.
Glucose Trace
This is a graph of the recent sensor glucose history (stored glucose readings over the past 8 hours), for readings up to 21 mmol/L. This graph is helpful as it summarizes and allows you to visually interpret the current glucose reading within the context of recent glucose levels; you can see where you are and where you’ve been, which helps you to decide what to do to best manage current glucose. This graph will be displayed for both Libre and Libre 2.
Glucose Trend
A glucose trend arrow tells you whether glucose is steady, rising or falling AND how quickly glucose is changing:
Glucose is falling quickly
(more than 0.1 mmol/L per minute).Glucose is falling gradually
(between 0.06 and 0.1 mmol/L per minute)Glucose is steady
(not significantly increasing nor decreasing, but is changing slowly, less than 0.06 mmol/L per minute.)Glucose is rising gradually
(between 0.06 and 0.1 mmol/L per minute)Glucose is rising quickly
(more than 0.1 mmol/L per minute).
Glucose trending is critical, because if glucose is 5.5 and falling, that’s very different than if glucose is 5.5 and rising! Trend info will be displayed for both Libre and Libre 2.
Sensor Life
Number of Operational Days left in your current sensor session. (For example, I just scanned and in the top left corner is the a sensor icon with the message “Ends in 9 days”)
Notes & Notifications
Both Libre and Libre 2 will provide notifications when you scan, including:
-
“Low Glucose” if reading is lower than 3.9 mmol/L (independent of the individual target range set).
-
“High Glucose” if reading is greater than 13.3 mmol/L (independent of the individual target range set).
-
“Glucose Going Low” if glucose is projected to be lower than 3.9 mmol/L within the next 15 mins.
-
“Glucose Going High” if glucose is projected to be greater than 13.3 mmol/L within the next 15 mins.
You can also enter digital notes into the reader to track food, insulin, exercise, and medication.
Alarms now available with Libre 2
As the "next generation of flash glucose monitoring," Libre 2 also now provides optional, real-time glucose alarms for flash users, even before you scan. The sensor is checking glucose every minute, and if the reading is outside of your target range, these alarms will let you know:
-
Low Glucose Alarm - based on the range that you have specified
-
High Glucose Alarm - again, based on the range that you have specified
-
Signal Loss Alarm - gives you a heads up when the transmitter and reader have lost communication (perhaps because they are too far apart, or there is something else interfering with Bluetooth), which means you will not be receiving alarms until the two are able to communicate again.
You will be notified in that minute with a sound or vibration (your choice), both through the Libre 2 reader or through the Freestyle Libre 2 phone app. They give you the option to "dismiss alarm, check glucose" To find out the actual number of your current glucose, you have to scan the sensor with whichever reader is connected.
In most other ways, Libre 2 works the same as the original system: you can still scan anywhere and anytime, without fingerpokes1 most of the time.
Remote Viewing of Glucose Data (Libre 2 only)
Another valuable feature that is now available with Libre 2, especially for parents, is that you can now view someone else's glucose data using the Libre LinkUp mobile app. This allows parents and other care-partners (spouses, partners and friends, for example) to monitor the Libre2-user's glucose readings, trends and recent history without having to be in the same location. Parents can keep their eyes on how things are going while their child is over at a friend's house or playing hockey. A partner can support a Libre2-user from a distance while they are traveling, at work, or at the gym. This gives everyone peace of mind and helps keep the PWD safe and feeling supported.
To Treat or Not to Treat?
When making treatment decisions (whether or not take fast-acting sugar as a low treatment, eat a slower-digesting snack, or give a correction dose insulin, and how much of either), with Libre 2 you do not need to confirm the sensor glucose with a fingerstick reading (except under these conditions¹), but it's wise to take these 3 factors into account:
-
The current glucose reading.
-
The glucose trend (represented by the arrow), and
-
The glucose graph (which gives background information about your glucose over the last 8 hours).
Consider these different scenarios and how you would take a different approach to managing blood glucose in each case...
If sensor glucose is in-range and steady, then you probably don't need to take any action right now. If glucose is at the lower end of your target-range and dropping, you may want to eat a snack to avoid a low. On the other hand, if glucose is above range and rising, you probably need to give a correction dose of insulin. If glucose is at the high end of your target-range and rising, whether or not you give a correction dose of insulin depends on whether you have eaten recently (and given insulin recently to cover that food); you may want to give time for things to settle out before you take action.
Data Storage
The reader stores about 90 days of glucose data (as long as you replace the sensor every 14 days and scan the sensor at least every 8 hours). So you can use it to view your History of glucose data, including:
-
Logbook = list of your glucose readings, both scanned and fingerstick readings (when the reader is used as a BG meter), as well as blood ketone results (when the reader is used as a ketone tester).
-
Daily Graph = a line graph representing the full 24 hours of sensor readings (not including meter results); you can scroll back through previous days’ data in graph format.
-
Average Glucose = a bar graph of sensor readings for each of four time periods throughout the day, for the past 7, 14, 30, or 90 days (not including meter results). You can see, for example, if your average blood glucose is highest in the morning, or in the evening. This allows you to adjust your blood glucose management strategies to target the most troublesome times of the day.
-
Daily Patterns = a graph that shows the pattern and variability of the glucose readings over a typical day (over the past 7, 14, 30, or 90 days). The median (midpoint) value is shown as a line graph, while the 10 – 90 percentile range is shown as a shaded area around the median line.
-
Low-Glucose Events = the total number of times your glucose dropped below the low threshold (in the past 7, 14, 30, or 90 days)
-
Sensor Usage = how often you scan your sensor, as an average number of “Scans Per Day” that you have performed, as well as the percentage of possible “Sensor Data Captured” from those scans.
-
Average Glucose = a bar graph of sensor readings for each of four time periods throughout the day, for the past 7, 14, 30, or 90 days (not including meter results). You can see, for example, if your average blood glucose is highest in the morning, or in the evening. This allows you to adjust your blood glucose management strategies to target the most troublesome times of the day.
-
Time in Target = the percentage of time, across all glucose readings, in which your glucose was “In Target”, “Above” or “Below” you individual target range (for the past 7, 14, 30, or 90 days)
(Note: The lower and upper thresholds for your target BG range can be set between 3.9 and 10.0 mmol/L. We set ours at 4.0-7.0. When our son was a toddler, his target BG range was 6.0 -10.0. You can set your Libre to whatever target range your child’s diabetes health care team has recommended, within the system’s upper and lower limits.)
Pros & Cons of Flash Glucose Monitoring:
Notes:
-
1. A fingerstick blood glucose check using a blood glucose meter is required:
-
During times of rapidly changing glucose levels (when interstitial fluid glucose levels may not accurately reflect blood glucose levels), or
-
if the reader or FreeStyle LibreLink app reports a low (hypoglycemia) or impending low, or
-
When symptoms do not match the reader/app readings.
-
2. The Libre 3 (available in Europe but not yet in Canada) Transmitter+Sensor pod is even smaller, at about the size of 2 stacked pennies.
References:
-
The Freestyle website, Libre 2 page
-
Freestyle Libre Flash Glucose Monitoring System User’s Manual, 2017
-
Abbott FreeStyle website, Libre page
SHARE THIS ARTICLE